
T minus three, two, one—we have lift off! You’ve worked hard to create and launch your blog. Now keep the momentum going with this new blog checklist of what to do, after your new blog is live.
I launched Tech For Bloggers in a fit of inspiration, after attending a blogging workshop last weekend. I wanted to grab on to that magic energy before it got drowned out by life, bills, chores and figuring out what groceries we need to get this weekend. It would be great to have more planning, preparation and writing up a bunch of posts before launch, but sometimes you have to fly by the seat of your pants.
If you’re reading this you might have launched a blog recently too, and are now trying to figure out what to do next. Come have a peek at my to-do list from when I launched this blog.
Tweak The Design
You won’t really know how your blog will look until your content and images have gone up on it. Now that you can see them on your blog, you’ll probably spot a few design features that can be improved or tweaked.
For me it was the font of the headings, line-height and size of the body text and navigation. I wanted to be sure this blog was easy and comfortable to read. I felt like I spent too much time on this, but I believe it’s important to sweat the details related to the reader’s experience.
Test In Different Browsers
This one relates to the previous point about tweaking the design. While planning and even when you are writing posts, you probably work on a laptop and don’t view your blog often on other screen sizes.
Pull out your phone and visit your site. Check if it’s easy to navigate and comfortable to read. Look at the spacing of your navigation menu and sidebar items – these frequently get missed on mobile.
Beyond design elements, check that all your blog features work as expected. These include your social sharing buttons, contact and email opt-in forms and any widgets you may have installed.
Finally, take note of the loading speed. If it feels slow to you, you can be your readers will feel it too.
Double Check Your Tagline & Settings
Guess who went live with his blog tagline set to the default “Just another WordPress site”?
Umm, yeah.
Navigate to your WordPress dashboard → Settings → and change the tagline to something else. Anything else. Even “David’s blog about tech” would be better than the default.
While you’re in the settings screen, set the site language, timezone and date format. These are small but important details. For example the timezone will ensure that your scheduled posts get published on time.
Put Your Best Foot Forward In Search and Social
Do you know how your site will look in the search results and when you share it on social media? Do they look meh and boring, or entice you to click?
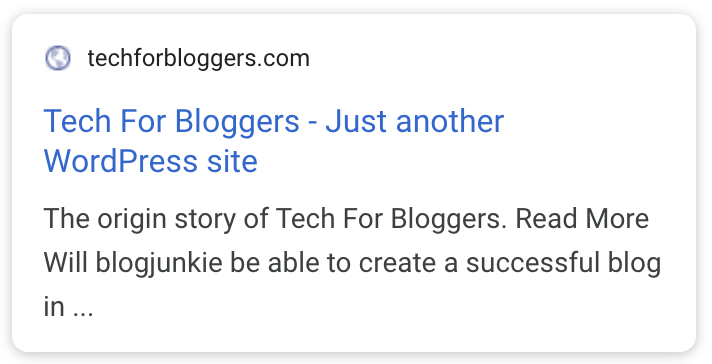
Unoptimized and so meh 😕 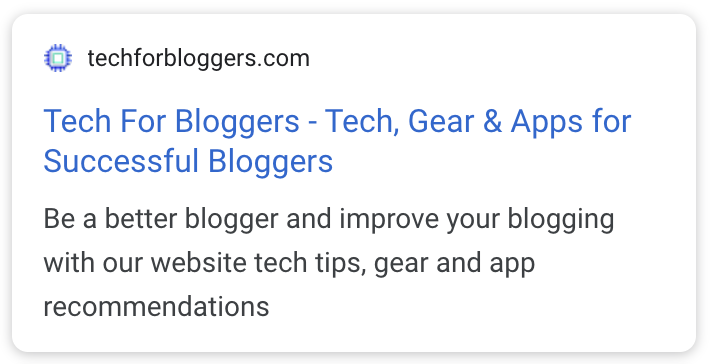
Optimized, with custom favicon 😍
These are the first impressions your blog will give readers. Make sure that it looks great in search and social media.
Review how your blog looks with these tools:
Then learn how to control your blog’s appearance:
Make a Great First Impression in the Search Results Page
Set The Image That Displays When Your Website Is Shared on Social Media
Check PageSpeed & Activate Caching
Google’s PageSpeed is a metric (score) that it uses to determine how quickly a page loads. It’s important to score well here because Google is now using it to determine which sites should rank higher.
Head on over to developers.google.com/speed/pagespeed/insights/ and plug in your blog’s homepage and best articles to check their scores.
You can improve your PageSpeed scores by activating caching on your blog. Caching can happen at different levels:
- On your blog via a plugin
- At the server’s built-in cache
- At a proxy which exists between your blog server and your audience (e.g. Cloudflare)
At the very least, you should install a caching plugin like WP-Rocket (paid) or Hummingbird (free). Learning and understanding the different features of these plugins will help improve your PageSpeed scores.
What to do if your PageSpeed scores are really bad? PageSpeed is notoriously difficult to score well on. It’s also pretty technical and difficult to understand, so it can be disheartening. My recommendation is to invest in WP-Rocket and activate the following settings under File Optimization:
- Optimize CSS delivery
- Remove Unused CSS
- Load JavaScript deferred
- Delay JavaScript execution
Setup Google Analytics
Installing Google Analytics is one of those tasks that can only be completed after your blog is live. GA helps you understand your best content and readers so you can improve your blog. It’s the industry standard, and brands will prefer GA stats over Jetpack or some other alternative. Follow my Google Analytics for Bloggers guide to set it up right.
Promote Your Blog
Switching gears a little, it’s time to tell others about your blog. Some of you will have already done it without a second thought, but I’m rather shy so I need to work up some courage. By now I know that my new blog is in good shape, and that I’ve already prepared it to make a good first impression with new visitors. Here’s what I did to promote the launch of Tech For Bloggers.
Social Media
I had already registered the social accounts for the blog, but they have been dormant. Now that the blog is live, I spruced up the profiles, shot a new profile picture and began posting on these accounts. By the way, follow me on Twitter and Instagram 😊
I planned my first few social posts together with the blog content plan. These first posts were really important to the launch, so I gave them as much attention as the blog articles. Depending on how social media goes I may separate out my social content planning.
I also began following lots of accounts that are related to my niche, then liking and commenting on their posts. Niches that feature lots of images like food blogging and photography should also create Pinterest boards and join group boards if you can.
Network and Outreach
A big part of my promotion plan was to personally share the new blog with other bloggers and people I follow on social media. These are people I already know and have interacted with before. I simply sent them a DM or text message asking them to check out the blog and mention it if they could. If you’ve connected with others while you’ve been posting on your social accounts, you can include them in your list of people to DM too.
Email List
Finally, I have a small email list from my business. They are a relevant audience and so I will be emailing them a short not about my new blog project too.
Review Plugins & Security
Now I head back to my WordPress dashboard. While I was creating the blog, I downloaded lots of different plugins and themes to try out. I looked through the list of plugins for any that didn’t make the cut and then deactivated and deleted them. Having too many plugins activated on your blog can slow it down, so it’s best to use as few as you can.
I also change my user account password and double check my email address because my web host’s support guys had to login to check on a problem. You always hear stories about blogs that get hacked—they are absolutely true so you want to use strong passwords, always.
Activate A Backup Strategy
Phew! It’s been a busy launch week, so I’m glad that my work is safely backed up. My hosting plan includes automatic backups, but I like to be redundant and keep my own backups. I use the free UpdraftPlus plugin and send the backup files to my Dropbox account.
If you don’t have a backup plan, I strongly advise you to install a backup plugin right now. When something breaks, you’ll be so relieved that you took the time to set up a backup strategy.
Please take the time to learn about backup and security. It’s as important as locking your house when you go out. You can learn more in my easy-to-understand guide about keeping WordPress hacker-free and running smoothly.
Planning, creating and launching a blog is hard work. Be sure to make the most of the launch and maximize your results with this checklist. To your success and mine!